I had the privilege of having the opportunity of implement a network infrastructure update for a small local property management company almost a year ago.
This was my first large (important at least) project in my endeavors to conquering the world.
These steps were tested in a testing environment and used in a live production environment with little difference.
Ordered Steps for Migration
1. Health Checks on Small Business Server 2003
First things first, make a SYSTEM STATE and FULL SYSTEM backup of your SBS before you start this process. After this is done, make sure to download and install all latest updates for SBS. Keep running Windows Update till there are no more updates available
2. Join Windows Server 2008 to domain as a member server
Connect Windows Server 2008 to network and let server receive an IP via DHPC. Open Command Prompt type IPCONFIG /ALL to make sure you have an IP address.
Join Server to Domain
- Click Start and Right Click Computer and select Properties.
- In the window that pops up under “Computer name, domain, and workgroup settings,” click “Change settings” at far right.
- In the Computer Name tab of the System Properties window, click change.
- Enter Computer name and select the radio button next to Domain and enter the name of the domain in which the 2003 server is apart of and click OK.
- You will be prompt for domain credentials with permission to add a computer to the domain, enter those and click OK.
- You will be informed that in order for changes to take effect, you need to restart computer. Restart your computer to continue process.
3. Prepare Active Directory for Windows Server 2008 server
You will need to raise the Functional Levels of the 2003 server. This involves raising the domain and forest functional level of Active Directory.
Raise the Domain Functional Level
- Click Start > Administrative Tools > Active Directory Users and Computer
- Right click domain and select Change domain functional level
- In the drop down box, select Windows Server 2003 and click OK
Raise the Forest Functional Level
- Click Start > Administrative Tools > Active Directory Domains and Trusts
- Right click domain and select Raise Domain Functional Level
- In the drop down box, select Windows Server 2003 and click OK
Before you can add Windows 2008r2 Server as a domain controller, you will need to prepare the SBS 2003 domain’s Active Directory.
- Insert the Windows 2008 DVD in to the Small Business Server. Do not autorun.
- Open Command Prompt and run the following commands. NOTE: X refers to the drive letter of your DVD drive
- X:supportadprepadprep32 /forestprep
- X:supportadprepadprep32 /domainprep
- X:supportadprepadprep32 /domainprep /gpprep
- X:supportadprepadprep32 /rodcprep
4. Make Windows Server 2008 a Domain Controller of existing Small Business Server 2003 Domain
This is the most straight forward task of this project.
Click Start > Run > type DCPROMO. This will start the installation process for installing Active Directory on your Windows 2008r2 Server.
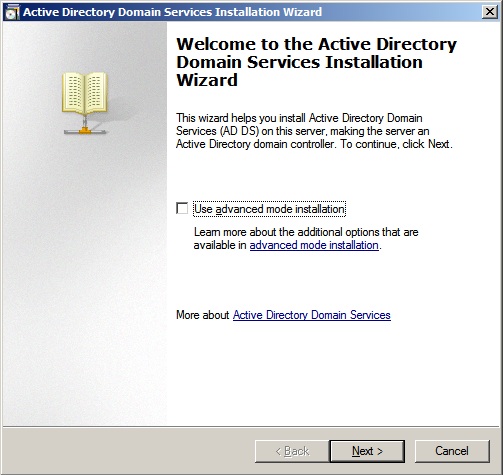
Leave “Use advanced mode installation” unchecked and continue my clicking next.
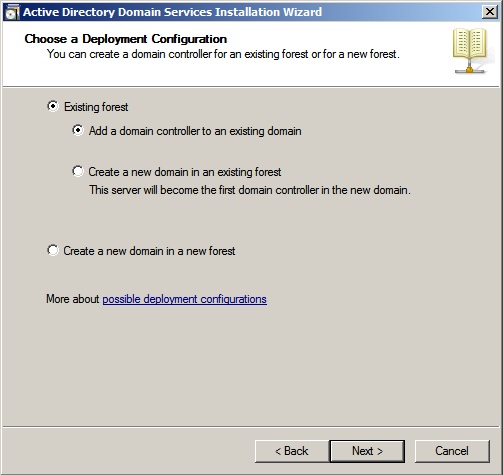
Select the radio buttons for “Existing forest” and “Add a domain controller to an existing domain” and click next.
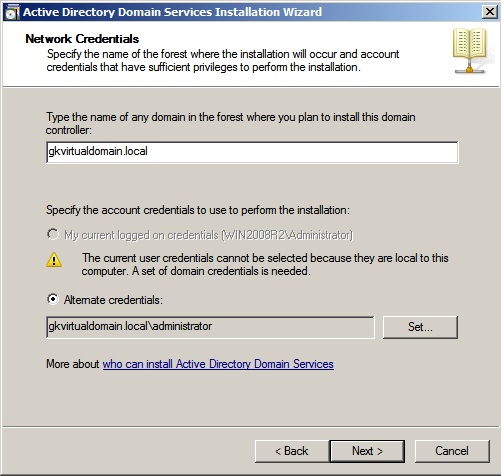
In the next window, Network Credentials, the domain should automatically populate. If you are logged in as a user with domain admin permissions click the “My current logged on credentials” radio button. If not, click the “Alternative credentials” and enter one with domain admin permissions.
The following screen will give you the results of a domain search and ask you which domain you want to add this domain controller to. As you are upgrading Small Business Server there should only be one. Click Next.
The next screen will give you an option to select the site for the new domain controller. If you have more than one Active Directory Site ensure that you select the correct one if it hasn’t been done by default. Click next.
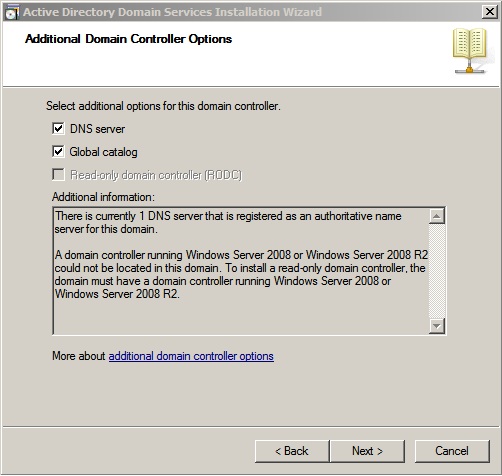
On the “Additional Domain Controllers Options” window, check both DNS Server and Global Catalog options and click Next. Continue through DNS message by clicking Yes.
Next window will ask you where you would like SYSVOL and Active Directory DB files etc,. Unless specified by anybody, just keep the default locations and click Next.
You will also be prompt to create a password for the Directory Services Restore Mode Administrator (DSRM). This password is used to boot the Domain Controller into Directory Services Restore Mode which is used for recovering corrupt, deleted, or failed Domain Controllers.
Click Next on the following windows and installation will take place. Check the box to reboot computer upon completion. Upon computer reboot, server will now be a domain controller.
5. Transfer DHCP Service
This assumes SBS 2003 was running DHCP role. This role will have to be transferred to the new Windows 2008r2 Server. You will have to install the DHCP role on your 2008 server.
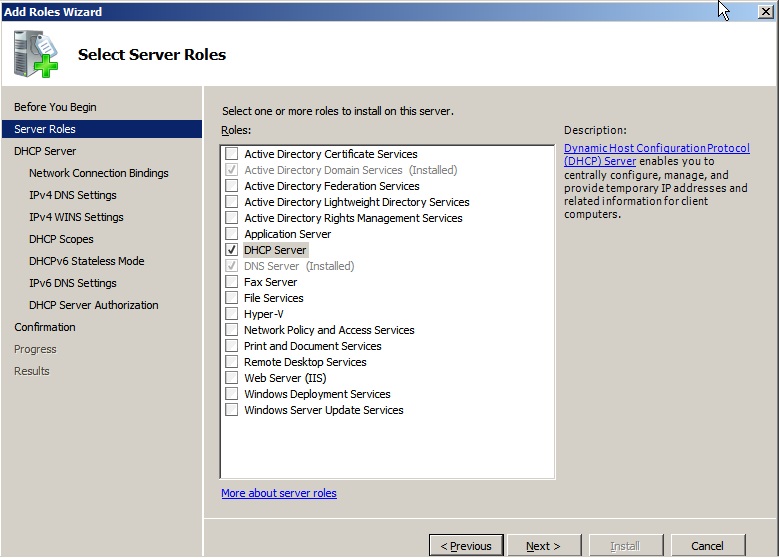
Open Server Manager and click Roles. Located on the far right, click Add Roles. In the Add Roles Wizard select DHCP Server.
Network Connection Bindings should be populated and check marked by default with your primary IP address.
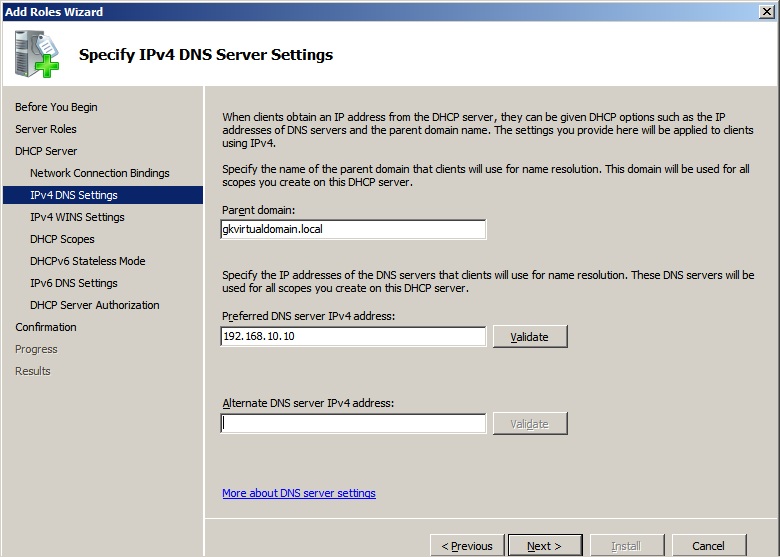
In the “Specify IPv4 DNS Server Settings” make sure Parent domain is correct. Preferred DNS server IPv4 address is set to the IP address of your 2008 server and the Alternate area is left blank. Leave default selection for the next window, the WINS Server Settings.
In order to keep the same DHCP scope as your SBS 2003 server, you will need to enter that information in the next window, DHCP Scopes.
Click Add
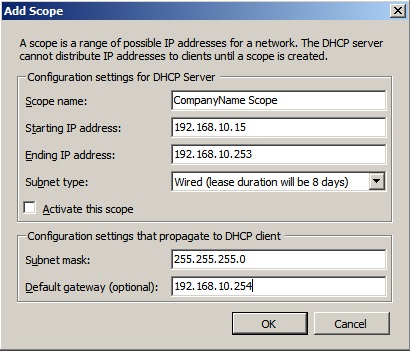
Enter the following information the same as in your SBS 2003 scope
- Scope Name
- Start IP address
- End IP address
- Uncheck the box that says Activate this scope
- Subnet will automatically populate. If not enter it as well.
- Enter Default gateway (Network router).
Click OK.
Accept all the IPv6 defaults
In Authorize DHCP Server window, use current credentials and click OK. DHCP will be installed on 2008 server.
You can technically turn off DHCP on your SBS Server and turn on DHCP on your 2008 server but it will cause you to have to manually release and renew settings on all client machines connected to your network. To have a better work flow follow these next instructions.
Do the following on the SBS server.
- Navigate to Start > Administrative Tools > DHCP this will open the DHCP snap-in.
- Right click on the Scope listed under your Small Business Server and select properties
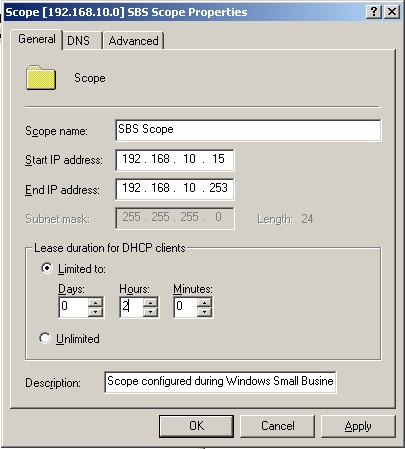
- In the “Lease duration for DHCP clients” change to 2 Hours and click OK.
- Under Address Leases, highlight all DHCP Leases, right click and select delete. (If you have any reserved addresses make sure they are not highlighted otherwise they will be deleted also.)
This action will cause all DHCP clients to renew their addresses and gain an address that has a 2 hour lease. Check the Address Leases and refresh until all the clients now have an IP address. (You might want to leave this overnight just to make sure all client receive IP addresses).
Once all the clients have now received a 2 hour lease from the Windows 2008 server do the following:
- Navigate to Start > Administrative Tools > DHCP
- Expand the Windows 2008 servername and IPv4 then right click on the scope listed.
- Select Activate
Once you start the DHCP role on the 2008 server, the SBS will detect that DHCP server role and automatically shutdown on its own. Client machines will start utilizing DHCP role on the 2008 server and all clients should have new IPs in approximately 2 hours.
DHCP Server service can be disabled on the SBS. Do not disable the DHCP Client service, as this plays a part in DNS registration.
Now that all the clients are using the new Windows 2008 Server for DHCP and DNS, you need to make sure that the SBS is also using the Windows 2008r2 Server for DNS.
To do this modify the TCP/IP properties of the network card and change the Primary DNS servers IP address to that of the Windows 2008 Server. Do not enter anything in the Secondary DNS server. You can follow the first solution posted here.
6. Migrate shared user data
Unfortunately there is not a solid solution in regards to migrating shared user data.
It may be different for every network and this solution might work for you or may cause damage in regards to user data.
I had the relieved pressure of not having to do this in a live environment. The network infrastructure that I updated to Server 2008 had an external NAS connected to the network and the user shares and share data was run with the NAS software. So I did not have to worry about this step. I did however run a test environment to test this whole migration process and did use this solution with success. That being said, THIS IN NOT AN ENDORSEMENT FOR THIS STEP. Please check out some other solutions as well.
The shares that are in use on the SBS need to be recreated on the Windows 2008 server. This requires working in the registry. Instructions can be found here.
Making sure you restored your folders and files from a backup of your SBS to your 2008 server, all you have to do is restore the copied registry files.
You will then need to update any login scripts which will be located in \LOCALHOSTSYSVOL on the 2008 server to ensure that any mapped drives are updated.
7. Transfer all 5 FSMO roles to Windows Server 2008 Domain Controller
Once all of the above is complete, you can now transfer your 5 FSMO roles to your 2008 server. NOTE: Attention needs to be taken in this step. Some of these can not be undone once action is taken.
The first three are located in Active Directory Users and Computer
- Click Start > Administrative Tools > Active Directory Users and Computers
- Right click on the domain name and select Operations Masters.
- On each tab (RID, PDC & Infrastructure) click the change button.
- Accept the confirmation that you want each role to be transferred.
The next is located in Active Directory Domains and Trusts
- Click Start > Administrative Tools > Active Directory Domains and Trusts.
- Right click where it says Active Directory Domains and Trusts and select Operations Master.
- Click the Change button and say yes to the notification dialog.
The last is located in Active Directory Schema which needs to be added as a snap-in from MMC. Follow these steps:
- Click Start > Run and type regsvr32 schmmgmt.dll
- Click OK to the confirmation
- Click Start > Run and type MMC and click OK
- Select File > Add/Remove Snap-in from the console
- From the list select Active Directory Schema, click Add
- Click Close and OK.
Now for the Schema Master role
- Right click on Active Directory Schema and select Change Active Directory Domain Controller
- Choose the Windows 2008 Server from the list and click OK
- Click OK on the warning Dialog box.
- Right click on Active Directory Schema and select Operations Master
- Click the Change button and say yes to the notification dialog
8. Demote Small Business Server 2003 server
Make sure SBS is not a Global Catalog Server
- Click on Start > Administrative Tools > Active Directory Sites and Services
- Locate SBS under the Servers folder
- Right click NTDS settings located under SBS and select properties.
- Remove the check from the Global Catalog check box and click OK/
- Close Active Directory Sites and Services snap-in.
Final step, run DCPROMO to demote SBS
- Click Start > Run and type DCPROMO and click OK
- Click next on the Welcome screen
- Do not check the box that says “This server is the last domain controller in the domain” and Click next
- Enter a new administrator password for the local administrator user and click next
The SBS server will remove Active Directory Services and will no longer be a Domain Controller. Once this is complete and the server is restarted, it can be shutdown and removed from the network and your migration is complete.